Build a Simple Lock
- CKB dev environment: OffCKB (≥v0.4.0)
- JavaScript SDK: CCC (≥v0.0.14-alpha.0)
Tutorial Overview
In this tutorial, you will learn how to create a full-stack dApp, including both the frontend and the Script, to deepen your understanding of CKB blockchain development.
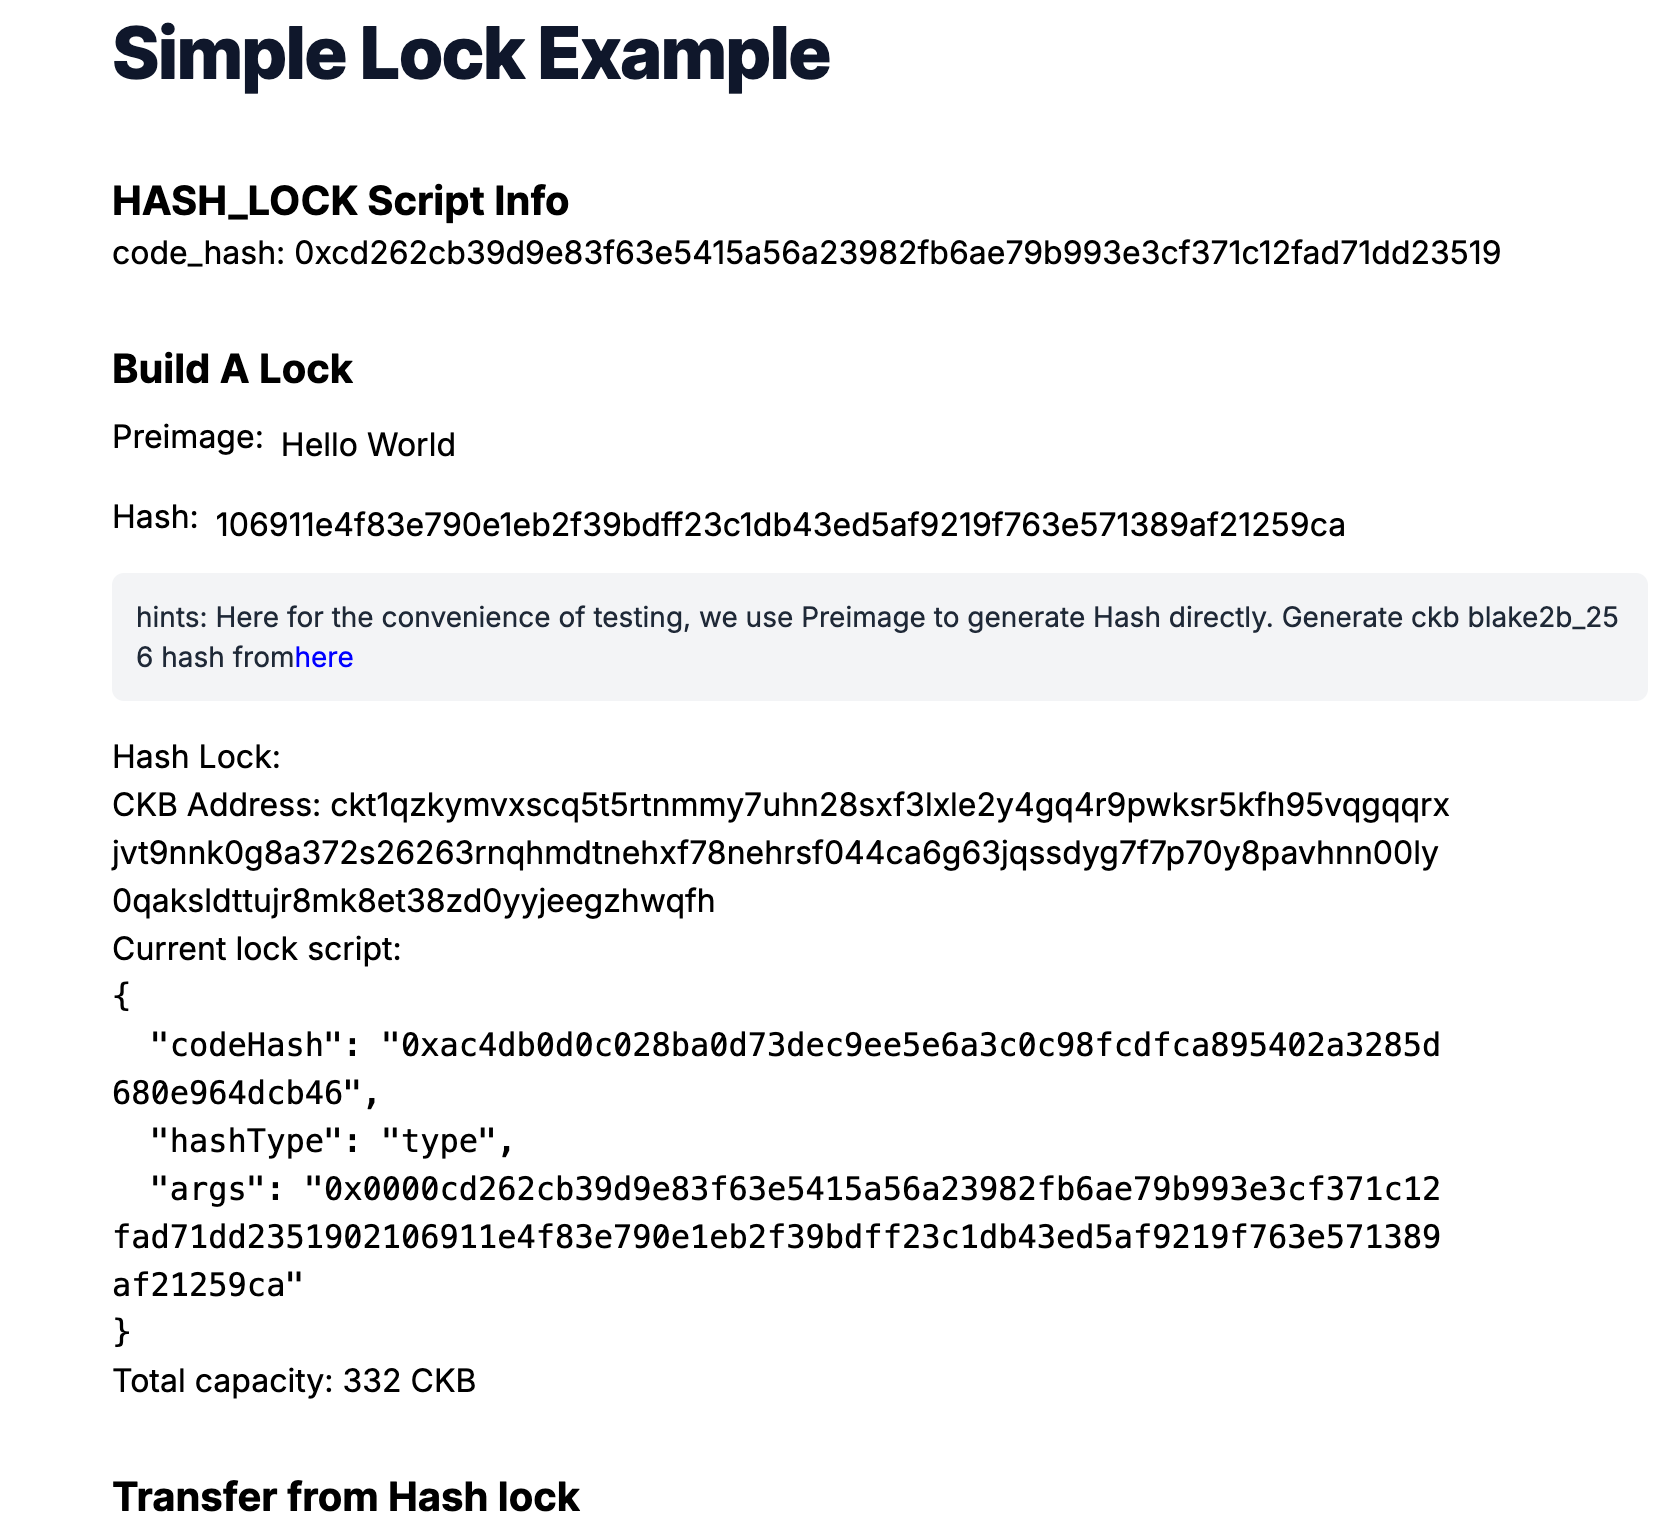
Our example dApp will use a simple toy lock. You will create a Lock Script named hash_lock to secure some CKB tokens and build a web interface for users to transfer tokens from this hash_lock.
The hash_lock project involves specifying a hash in the Script's script_args. To unlock it, users must provide the preimage that matches this hash.
This toy lock example isn't intended for production. Use it ONLY in Testnet or Devnet as a starting point for learning the basics.
This tutorial uses JavaScript/TypeScript contracts running on ckb-js-vm. For production use, we recommend using Rust. You can find a Rust implementation of the same hash-lock logic here.
Setup Devnet & Run Example
Step 1: Download the Source Code
To get started with the tutorial dApp, clone the repository and navigate to the appropriate directory:
git clone https://github.com/nervosnetwork/docs.nervos.org.git --depth 1
cd docs.nervos.org/examples/dApp/simple-lock
You can also read the full code online or download it here.
Step 2: Start the Devnet
To interact with the dApp, ensure that your Devnet is up and running. After installing @offckb/cli, open a terminal and start the Devnet with the following command:
- Command
- Response
offckb node
Launching CKB devnet Node...
CKB devnet RPC Proxy server running on http://127.0.0.1:28114
You might want to check pre-funded accounts and copy private keys for later use. Open another terminal and execute:
- Command
- Response
offckb accounts
Print account list, each account is funded with 42_000_000_00000000 capacity in the genesis block.
[
  {
    privkey: '0x6109170b275a09ad54877b82f7d9930f88cab5717d484fb4741ae9d1dd078cd6',
    pubkey: '0x02025fa7b61b2365aa459807b84df065f1949d58c0ae590ff22dd2595157bffefa',
    lockScript: {
      codeHash: '0x9bd7e06f3ecf4be0f2fcd2188b23f1b9fcc88e5d4b65a8637b17723bbda3cce8',
      hashType: 'type',
      args: '0x8e42b1999f265a0078503c4acec4d5e134534297'
    },
    address: 'ckt1qzda0cr08m85hc8jlnfp3zer7xulejywt49kt2rr0vthywaa50xwsqvwg2cen8extgq8s5puft8vf40px3f599cytcyd8',
    args: '0x8e42b1999f265a0078503c4acec4d5e134534297'
  },
  {
    privkey: '0x9f315d5a9618a39fdc487c7a67a8581d40b045bd7a42d83648ca80ef3b2cb4a1',
    pubkey: '0x026efa0579f09cc7c1129b78544f70098c90b2ab155c10746316f945829c034a2d',
    lockScript: {
      codeHash: '0x9bd7e06f3ecf4be0f2fcd2188b23f1b9fcc88e5d4b65a8637b17723bbda3cce8',
      hashType: 'type',
      args: '0x758d311c8483e0602dfad7b69d9053e3f917457d'
    },
    address: 'ckt1qzda0cr08m85hc8jlnfp3zer7xulejywt49kt2rr0vthywaa50xwsqt435c3epyrupszm7khk6weq5lrlyt52lg48ucew',
    args: '0x758d311c8483e0602dfad7b69d9053e3f917457d'
  },
  #...
]
Step 3: Build and Deploy the Script
To compile the contract, navigate to the root directory and run:
- Command
- Response
pnpm install
pnpm build
> node scripts/build-all.js

Building 1 contract(s): hash-lock

📦 Building contract: hash-lock
Building hash-lock from contracts/hash-lock/src/index.ts...
📦 Bundling with esbuild...
🔧 Compiling to bytecode...
✅ Contract 'hash-lock' built successfully!
📄 JavaScript: dist/hash-lock.js
🔗 Bytecode: dist/hash-lock.bc
✅ Successfully built: hash-lock

🎉 All contracts built successfully!
Once compiled, the contract files will be available in the simple-lock/dist directory.
Deploy the Script binary to the Devnet:
- Command
- Response
pnpm run deploy --network devnet
> node scripts/build-all.js && node scripts/deploy.js "--network" "devnet"

Building 1 contract(s): hash-lock

📦 Building contract: hash-lock
Building hash-lock from contracts/hash-lock/src/index.ts...
📦 Bundling with esbuild...
🔧 Compiling to bytecode...
✅ Contract 'hash-lock' built successfully!
📄 JavaScript: dist/hash-lock.js
🔗 Bytecode: dist/hash-lock.bc
✅ Successfully built: hash-lock

🎉 All contracts built successfully!
🚀 Deploying contracts...
📁 Target: dist
📄 Output: deployment
🌐 Network: devnet

💻 Running: offckb deploy --network devnet --target dist --output deployment

You are about to deploy the following contracts:

- /Users/Desktop/docs.nervos.org/examples/simple-lock/dist/hash-lock.bc

The deployment will be saved to /Users/Desktop/docs.nervos.org/examples/simple-lock/deployment

The network is: devnet
? Are you sure you want to deploy these contracts? yes
contract hash-lock.bc deployed, tx hash: 0x5f71110ed1ab57196976f357083d4c4fd767de6088a97fad6846ec9559c61f58
wait for tx confirmed on-chain...
tx committed.
Saving artifacts for hash-lock.bc...
hash-lock.bc deployment.toml file /Users/Desktop/docs.nervos.org/examples/simple-lock/deployment/devnet/hash-lock.bc/deployment.toml generated successfully.
Migration json file /Users/Desktop/docs.nervos.org/examples/simple-lock/deployment/devnet/hash-lock.bc/migrations/2025-09-08-205232.json generated successfully.
Script info file /Users/Desktop/docs.nervos.org/examples/simple-lock/deployment/scripts.json generated successfully.

🎉 Deployment completed successfully!
📁 Deployment artifacts saved to: deployment/

💡 Next steps:

- Check the deployment artifacts in the deployment/ folder
- Run your tests to use the deployed contract scripts
The deployment artifacts will be saved to the examples/simple-lock/deployment directory.
Step 4: Run the DApp
Next, you need to copy the scripts.json file from deployment folder to the frontend/deployment directory.
Then, navigate to the frontend folder, install the node dependencies, and start running the example:
- Command
- Response
cd frontend && pnpm i && pnpm run dev
> frontend@0.1.0 dev
> next dev

▲ Next.js 14.2.3

- Local: http://localhost:3000
- Environments: .env

✓ Starting...
✓ Ready in 1631ms
Now, the app is running in http://localhost:3000.
At the top of the page, developers can select their preferred language based on their needs.
Step 5: Deposit Some CKB
With our dApp up and running, you can now input a hash value to construct a hash_lock Script. To utilize this hash_lock Script, we need to prepare some Live Cells that use this Script as their Lock Script. This preparation process is known as deposit. We can use offckb to quickly deposit to any CKB address. Here's an example of how to deposit 300 CKB into a specific address:
- Command
- Response
offckb deposit --network devnet ckt1qp02fww4qzf6rx2rm3ugc9dmma7dnky7l4ne3xsck930aj5pfkgtkqgqqpdsmqftz49xmjqgm2yr0ejj5jpsgw9w6vtazlaukdf9xecu4z32kqgsdyg7f7p70y8pavhnn00ly0qaksldttujr8mk8et38zd0yyjeegxctl4m 300
tx hash: 0x0668292c875ee31906e48651a553a16158307c02f2e91d24be75166ca080e1fd
Once you've deposited some CKB into the hash_lock CKB address, you can attempt to transfer some balance from this address to another. This will allow you to test the hash_lock Script and see if it functions as expected.
You can try clicking the "Transfer" button. The website will prompt you to enter the preimage value. If the preimage is correct, the transaction will be accepted on-chain. If not, the transaction will fail because our hash_lock Script rejects the incorrect preimage and works as expected.
Behind the Scene
Script Logic
Here's what the script does step-by-step:
- It reads the expected hash from the Script's
argsfield. - It retrieves the preimage from the transaction's witness field.
- It computes the hash of the preimage using the default CKB hash function (
blake2b-256). - If the computed hash matches the one in the
script_args, the script returns success (0). Otherwise, it fails.
Here is the complete hash_lock script logic:
import * as bindings from "@ckb-js-std/bindings";
import { HighLevel, log, hashCkb, bytesEq } from "@ckb-js-std/core";

function main() {
  log.setLevel(log.LogLevel.Debug);
  let expect_hash = new Uint8Array(HighLevel.loadScript().args).slice(35);

  let witness_args = HighLevel.loadWitnessArgs(0, bindings.SOURCE_GROUP_INPUT);
  let preimage = witness_args.lock!;

  let hash = hashCkb(preimage);

  if (!bytesEq(hash, expect_hash.buffer)) {
    log.error(`Check hash failed: ${new Uint8Array(hash)}, ${expect_hash}`);
    return 11;
  } else {
    return 0;
  }
}

bindings.exit(main());
A few key things to highlight for developers coming from the JavaScript ecosystem:
- The
@ckb-js-std/coreandbindingslibraries provide high-level syscalls for accessing blockchain data. HighLevel.loadScript()gets the current Script, and.argsretrieves the expected hash.HighLevel.loadWitnessArgs()fetches the witness for the transaction input, where the preimage is stored.hashCkb()is used to calculate theblake2b-256hash.- If the hash matches, the script returns
0. Otherwise, it logs the error and returns a failure code (11).
This approach demonstrates how to write on-chain logic in a developer-friendly TypeScript environment, allowing you to test and iterate quickly with familiar tooling.
Use the Hash_Lock Script in Your DApp
Let's take a look at the generateAccount function: It accepts a hash string parameter. This hash string is used as script_args to build a hash_lock Script. This Script can then be used as the lock to secure CKB tokens.
// ...
export function generateAccount(hash: string) {
  const lockArgs =
    "0x0000" +
    myScripts["hash-lock.bc"]!.codeHash.slice(2) +
    hexFrom(hashTypeToBytes(myScripts["hash-lock.bc"]!.hashType)).slice(2) +
    hash;
  const lockScript = {
    codeHash: mySystemScripts["ckb_js_vm"]!.script.codeHash,
    hashType: mySystemScripts["ckb_js_vm"]!.script.hashType,
    args: lockArgs,
  };
  const address = ccc.Address.fromScript(lockScript, cccClient).toString();
  return {
    address,
    lockScript: ccc.Script.from(lockScript),
  };
}
// ...
Another important aspect of the generateAccount function is that it also returns a CKB address. This address is computed from the Lock Script using CCC utils ccc.Address.fromScript. Essentially, the CKB address is just the encoded version of the Lock Script.
Think of it like a safe deposit box. The address is like the serial number of the lock (used to identify the lock) on top of the safe box. When you deposit CKB tokens into a CKB address, it's like depositing money into a specific safe box with a specific lock.
When we talk about how much balance a CKB address holds, we're simply referring to how much value a specific lock secures. The balance (capacities) calculation function in our frontend code works by collecting the Live Cells that use a specific Lock Script and summing their capacities.
// ...
export async function capacityOf(address: string): Promise<bigint> {
  const addr = await ccc.Address.fromString(address, cccClient);
  let balance = await cccClient.getBalance([addr.script]);
  return balance;
}
// ...
To transfer (or unlock) CKB from this hash_lock Script address, we need to build a CKB transaction that consumes some Live Cells which use the hash_lock Script and generates new Live Cells which use the receiver's Lock Script. Additionally, in the witness field of the transaction, we need to provide the preimage for the hash value in the hash_lock Script args to prove that we are indeed the owner of the hash_lock Script (since only the owner knows the preimage).
We use CCC to build such a transaction.
// ...
export async function unlock(
  fromAddr: string,
  toAddr: string,
  amountInCKB: string
): Promise<string> {
  const fromScript = (await ccc.Address.fromString(fromAddr, cccClient)).script;
  const toScript = (await ccc.Address.fromString(toAddr, cccClient)).script;
  const readSigner = new ccc.SignerCkbScriptReadonly(cccClient, fromScript);

  // Build the full transaction
  const tx = ccc.Transaction.from({
    outputs: [{ lock: toScript }],
    outputsData: [],
  });

  // CCC transactions are easy to be edited
  tx.outputs.forEach((output, i) => {
    if (output.capacity > ccc.fixedPointFrom(amountInCKB)) {
      alert(`Insufficient capacity at output ${i} to store data`);
      return;
    }
    output.capacity = ccc.fixedPointFrom(amountInCKB);
  });

  // fill the witness with preimage
  const preimageAnswer = window.prompt("please enter the preimage: ");
  if (preimageAnswer == null) {
    throw new Error("user abort input!");
  }
  const newWitnessArgs = new ccc.WitnessArgs(
    stringToBytesHex(preimageAnswer) as `0x${string}`
  );
  console.log("newWitnessArgs: ", newWitnessArgs);
  tx.setWitnessArgsAt(0, newWitnessArgs);

  // Complete missing parts for transaction
  await tx.addCellDeps(myScripts["hash-lock.bc"]!.cellDeps[0].cellDep);
  await tx.completeInputsByCapacity(
    readSigner,
    ccc.fixedPointFrom(amountInCKB)
  );
  const balanceDiff =
    (await tx.getInputsCapacity(cccClient)) - tx.getOutputsCapacity();
  console.log("balanceDiff: ", balanceDiff);
  if (balanceDiff > ccc.Zero) {
    tx.addOutput({
      lock: fromScript,
    });
  }
  //await tx.completeFeeBy(readSigner, 1000);

  const txHash = await cccClient.sendTransaction(tx);
  console.log("Full transaction: ", tx.stringify());
  return txHash;
}
Is the Hash_Lock Safe to Use?
The short answer is no. The hash_lock is not very secure for guarding your CKB tokens. Some of you might already know the reason, but here are some points to consider:
- Miner Front-running: Since the preimage value is revealed in the witness, once you submit the transaction to the blockchain, miners can see this preimage and construct a new transaction to transfer the tokens to their addresses before you do.
- Balance Vulnerability: Once you transfer part of the balance from the
hash_lockaddress, the preimage value is revealed on-chain. This makes the remaining tokens locked in thehash_lockvulnerable since anyone who sees the preimage can steal them.
Even though using a hash and preimage is too simple to be a secure Lock Script, it's a great starting point for learning. The goal is to understand how CKB Scripts work and gain experience with CKB development.
Congratulations!
By following this tutorial, you've mastered the basics of building a custom lock and a full-stack dApp on CKB. Here's a quick recap:
- We built a custom Lock Script to guard CKB tokens.
- We built a dApp frontend to transfer/unlock tokens from this Lock Script.
- We explored the limitations and vulnerabilities of our naive Lock Script design.
Next Step
Now that your dApp works great on the local blockchain, you might want to switch it to different environments like Testnet or Mainnet.
To do that, simply change the NETWORK environment variable to testnet:
export NETWORK=testnetThen restart the dApp. It should connect to the Testnet automatically.
For more details, check out the full source code.
Additional Resources
- Rust Quick Start — Learn how to write CKB Scripts in Rust (recommended for production)
- Rust Example: Simple Lock — The same hash-lock logic implemented in Rust (standalone contract, without frontend)
- CKB transaction structure: RFC-0022-transaction-structure
- CKB data structure basics: RFC-0019-data-structure